
An IK Leg and a Bug Hunt
Im not sure I can truely put into words how frustrating creating the IK leg for this rig was. I do know, however, that creating a stretchy IK leg should not take almost 48 hours to get working.
Before I duplicated my bones, I decided I wanted to put some extra bones along the lower leg to enable smoother twisting. To ensure things worked nicely later on I wanted to ensure that the three new bones I inserted were exactly a quarter, half and three-quarters of the way along the calf. To do this, I parent constrained each of the three bones to both the knee and the ankle, and made sure maintain offset was unticked. This placed all three bones exactly half way between the knee and ankle. I then changed the weighting of the parenting to two of them. Femur01 was weighted 0.75 to the knee and 0.25 to the ankle, whilst Femur03 was weighted 0.25 to the knee and 0.75 to the ankle. I then deleted the constraints and used comet tools to orient the joints correctly.

Once this was complete I created two duplicates (one for IK, one for FK). I then created a third duplicate in which I deleted the three femur joints and reparented the ankle straight to the knee. This was so that I had just two bones in the IK system. I called it the IKGuide. I created an IK on the joints and made a simple cube controller for the foot. I parented the IK handle to this control. I then orient constrained the ankle bone to this controller so that it would not rotate as the leg moved. Finally, I created a simple circle controller and parent constrained the hip bone at the top of the IK to the circle.
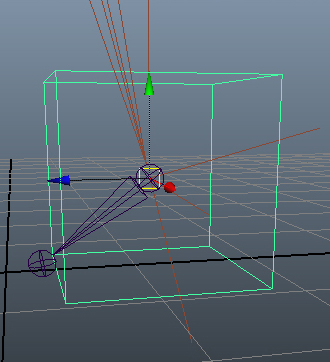
With the IK built and working, I started to set up the IK stretch. Like the IK spine, I needed to know how long the leg was at any one point in time. However, I only needed the straight line distance from hip to ankle. I used the distance tool for this. I aligned one locator with the hip and one with the ankle and then parented them to the corresponding controllers. Now, as the leg moved, the distance tool would always give the distance from hip to ankle. At this point I also realised I had not created a knee controller. For this I used an arrow shape. I point constrained the arrow to both the hip and ankle (with maintain offset unticked). This placed the arrow on the plane between the two, directly in the centre. I then used an aim constraint to ensure the arrow was pointing directly at the knee. After deleting both constraints I moved the arrow in front of the knee and set up a pole vector constraint on the IK.

To wire up the stretchy leg I used another multiply divide node and, like the spine, the distance was wired to the first input. The second input needed to be the length of the thigh bone plus the length of the calf bone. As the joints had been oriented correctly this could be found simply by adding the x transform of the knee and ankle together. I changed the node to divide and wired the output to the “true” output of a condition node. The “false” output was left as 1. The condition node also had the distance in the first input and the length of the two bones as the second. It then compared the two lengths, and if the distance was greater than the bone length, the condition was true. I then wired this condition node to the x scale (length) of the thigh and calf. The two bones of the IK scaled nicely. Unfortunately, the ankle and foot bones were being scaled strangely when the leg stretched, despite not being wired to the condition node. I even checked the scale of both and x, y and z were all still showing as 1. This meant the bones shouldnt have been scaling at all.


I tried deleting the IK and remaking it, but the problem persisted. I then tried moving the controls with no IK present at all, and the ankle and foot continued stretching strangely. I could only assume there was something strange with the bones, so I deleted the IKGuide joints and re-created them. I set everything back up, re-wired the thigh and calf x-scale to the condition node and tested it again. I had exactly the same problem all over again. I tried re-creating the bones once more that evening but with no success. I finally decided the only option was to go to bed and look at it with a fresh mind in the morning.
As is often the way with re-visiting a problem the next day, I tracked the issue down quite quickly. I had all the joints in the hypershade to make sure my ankle and foot definitely hadnt managed to end up wired to anything and I realised there was no line showing the parenting of ankle to knee. I un-parented the ankle bone and re-parented it to the knee and the problem disappeared. I was delighted, until I found yet another problem. Whilst the ankle was no longer scaling strangely, it still was not doing what I expected when I moved the hip too far away. Despite being orient constrained the foot controller (and as such theoretically unable to rotate by itself) when I moved the hip controller forwards or backwards so that the leg stretched, my ankle would rotate.


I decided to fix the problem by simply creating a new version of the ankle and foot bone. I simply point constrained the new ankle joint to the one on the IK leg and orient constrained it to the controller again. Success! Problem solved, just not as tidily as I would have liked. It also left me feeling frustrated because I wanted to know why the problem had occured so I could avoid it in the future. Still, at least the problem was gone and I could get on with parent constraining the IK joints to the IKGuide joints. I unticked maintain offset and parent constrained all the joints to their respective guide joints. I parented the three femur joints in the same way I created them; by parenting to both knee and ankle and then editting the weights. However, what I hadn’t thought of was that a parent constraint would cause the joints to rotate out of alignment due to the ankle’s orientation. I pondered the problem for a while and decided I would simply ensure to maintain offsets when constraining the deform joints to the IK joints.

I then set to work creating a control system for the toes so that I could create a simple set of foot roll controllers. Initially I decided to place a circle controller around each joint of the toes, but it quickly became clear that some of them would be hard to select.

Instead, I moved the curve shapes of the controllers above each toe joint and this made them much clearer and easier to see. Finally, I also made a main controller that would be used to curl all the joints of a toe. I then began creating a simple set of foot roll controls and with some re-parenting of the IK handle my IK leg was complete.


Unfortunately, I quickly checked things in my orthographic side view and realised that at some point during the creation process I had managed to cause the entire IK system to move out of alignment from its starting position, despite all the controls being at 0, 0, 0.

The only option was to yet again build the entire IK leg. I deleted all my bones, mirrored the right hand leg to the left hand side. The good thing was, that at least this time all the controllers were already built so all I needed to do was wire everything up correctly, and make sure my controllers were correctly aligned before constraining/parenting things to them. Fortunately, this time I got it right and my left IK leg was finally complete. Hooray!